2020. 12. 8. 16:52ㆍ재주껏 하는 Front-End/Svelte (준비중)
이번에는 Svelte에서 제공하는 애니메이션에 대해 알아보자. Svelte의 애니메이션은 내장 모듈인 Flip과 사용자 정의 애니메이션을 제공한다. 먼저, Flip 효과에 대해 알아보자.
Flip
Flip 애니메이션은 요소가 추가되거나 제거될 때 부드럽게 밀리고 접히는 애니메이션으로, 리스트를 표현하고자 할 때 사용하기 좋은 애니메이션이다. Flip을 사용하는 방법은 아래와 같다.
import { flip } from 'svelte/animate'
<적용할 대상 요소 animate:flip>
<적용할 대상 요소 animate:flip={{ duration: 유지 시간, delay: 지연 시간, easing: 효과 종류 }}>
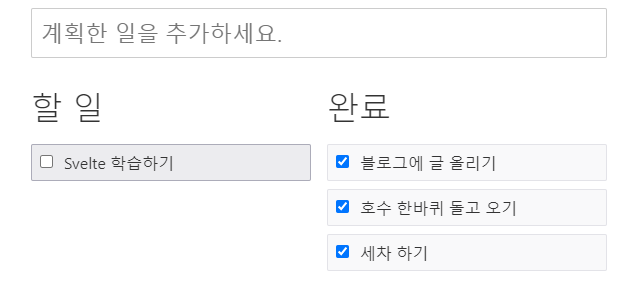
아래의 예제는 Svelte로 만든 Todolist 애플리케이션으로 상단 Input 태그에 할 일을 적고 Enter키를 누르면 좌측에 할 일이 추가된다. 계획한 일을 완료하면 아이템 좌측에 체크박스를 선택하여 우측에 완료 리스트로 보낸다. 만약, 아이템을 삭제하고 싶다면 아이템 우측에 휴지통 아이콘을 클릭하여 리스트에서 제거한다.
Flip 효과를 적용하기 위해서는 스크립트 상단에 Flip 함수를 Import 하고, 애니메이션이 적용될 <label> 요소의 animate 디렉티브에 함수를 바인딩하면 애니메이션이 적용된다.
<script>
	import { flip } from 'svelte/animate';

	let uid = 1;

	let todos = [
		{ id: uid++, done: false, description: 'Svelte 학습하기' },
		{ id: uid++, done: false, description: '세차 하기' },
		{ id: uid++, done: true,  description: '블로그에 글 올리기' },
		{ id: uid++, done: false, description: '호수 한바퀴 돌고 오기' }
	];

	function add(input) {
		const todo = {
			id: uid++,
			done: false,
			description: input.value
		};

		todos = [todo, ...todos];
		input.value = '';
	}

	function remove(todo) {
		todos = todos.filter(t => t !== todo);
	}

	function mark(todo, done) {
		todo.done = done;
		remove(todo);
		todos = todos.concat(todo);
	}
</script>

<div class='board'>
	<input
		placeholder="계획한 일을 추가하세요."
		on:keydown={e => e.key === 'Enter' && add(e.target)}
	>

	<div class='left'>
		<h2>할 일</h2>
		{#each todos.filter(t => !t.done) as todo (todo.id)}
			<label animate:flip>
				<input type=checkbox on:change={() => mark(todo, true)}>
				{todo.description}
				<button on:click="{() => remove(todo)}">remove</button>
			</label>
		{/each}
	</div>

	<div class='right'>
		<h2>완료</h2>
		{#each todos.filter(t => t.done) as todo (todo.id)}
			<label class="done"
						 animate:flip
			>
				<input type=checkbox checked on:change={() => mark(todo, false)}>
				{todo.description}
				<button on:click="{() => remove(todo)}">remove</button>
			</label>
		{/each}
	</div>
</div>

<style>
	.board {
		display: grid;
		grid-template-columns: 1fr 1fr;
		grid-gap: 1em;
		max-width: 36em;
		margin: 0 auto;
	}

	.board > input {
		font-size: 1.4em;
		grid-column: 1/3;
	}

	h2 {
		font-size: 2em;
		font-weight: 200;
		user-select: none;
		margin: 0 0 0.5em 0;
	}

	label {
		position: relative;
		line-height: 1.2;
		padding: 0.5em 2.5em 0.5em 2em;
		margin: 0 0 0.5em 0;
		border-radius: 2px;
		user-select: none;
		border: 1px solid hsl(240, 8%, 70%);
		background-color:hsl(240, 8%, 93%);
		color: #333;
	}

	input[type="checkbox"] {
		position: absolute;
		left: 0.5em;
		top: 0.6em;
		margin: 0;
	}

	.done {
		border: 1px solid hsl(240, 8%, 90%);
		background-color:hsl(240, 8%, 98%);
	}

	button {
		position: absolute;
		top: 0;
		right: 0.2em;
		width: 2em;
		height: 100%;
		background: no-repeat 50% 50% url("data:image/svg+xml,%3Csvg xmlns='http://www.w3.org/2000/svg' viewBox='0 0 24 24'%3E%3Cpath fill='%23676778' d='M12,2C17.53,2 22,6.47 22,12C22,17.53 17.53,22 12,22C6.47,22 2,17.53 2,12C2,6.47 6.47,2 12,2M17,7H14.5L13.5,6H10.5L9.5,7H7V9H17V7M9,18H15A1,1 0 0,0 16,17V10H8V17A1,1 0 0,0 9,18Z'%3E%3C/path%3E%3C/svg%3E");
		background-size: 1.4em 1.4em;
		border: none;
		opacity: 0;
		transition: opacity 0.2s;
		text-indent: -9999px;
		cursor: pointer;
	}

	label:hover button {
		opacity: 1;
	}
</style>
실행 결과는 아래와 같다.
Flip 애니메이션의 경우 DOM에 접근하여 요소의 움직임을 자바스크립트로 컨트롤하는 것이 아닌 CSS로 적용하는 것이기 때문에 성능상 큰 문제를 일으키지 않는다.
사용자 정의 애니메이션
Svelte의 애니메이션은 animate 디렉티브에 지정 함수를 설정하는 것이기 때문에 사용자가 원하는 대로 애니메이션을 구성할 수 있다. animate 디렉티브의 구조는 아래와 같다.
animation =(node: HTMLElement, { from: 출발지 요소, to: 목적지 요소 } , params: any) => {
delay : 지연 시간,
duration : 유지 시간,
easing : easing 함수, // https://svelte.dev/docs#svelte_easing 참고
css : CSS 리턴 함수,
tick : 반복 호출 때 실행되는 함수
}
위에서 활용한 Todolist에 사용자 정의 애니메이션을 적용해보자. <script> 태그를 아래와 같이 변경한다.
<script>
  // 추가
  import { cubicOut } from 'svelte/easing';

  ...

  // 추가
  function whizz(node, { from, to }, params) {
      const dx = from.left - to.left;
      const dy = from.top - to.top;

      const d = Math.sqrt(dx * dx + dy * dy);

      return {
          delay: 0,
          duration: Math.sqrt(d) * 120,
          easing: cubicOut,
          css: (t, u) =>
              `transform: translate(${u * dx}px, ${u * dy}px) rotate(${t*360}deg);`
      };
  }
</script>
다음 HTML 탬플릿의 animate 디렉티브를 위에서 추가한 whizz로 바꿔주자.
...

<div class='left'>
	<h2>할 일</h2>
	{#each todos.filter(t => !t.done) as todo (todo.id)}
		<label animate:whizz>
			<input type=checkbox on:change={() => mark(todo, true)}>
			{todo.description}
			<button on:click="{() => remove(todo)}">remove</button>
		</label>
	{/each}
</div>

...
전체 코드는 아래와 같다.
<script>
	import { cubicOut } from 'svelte/easing';

	let uid = 1;

	let todos = [
		{ id: uid++, done: false, description: 'Svelte 학습하기' },
		{ id: uid++, done: false, description: '세차 하기' },
		{ id: uid++, done: true,  description: '블로그에 글 올리기' },
		{ id: uid++, done: false, description: '호수 한바퀴 돌고 오기' }
	];

	function add(input) {
		const todo = {
			id: uid++,
			done: false,
			description: input.value
		};

		todos = [todo, ...todos];
		input.value = '';
	}

	function remove(todo) {
		todos = todos.filter(t => t !== todo);
	}

	function mark(todo, done) {
		todo.done = done;
		remove(todo);
		todos = todos.concat(todo);
	}

	function whizz(node, { from, to }, params) {

		const dx = from.left - to.left;
		const dy = from.top - to.top;

		const d = Math.sqrt(dx * dx + dy * dy);

		return {
			delay: 0,
			duration: Math.sqrt(d) * 120,
			easing: cubicOut,
			css: (t, u) =>
				`transform: translate(${u * dx}px, ${u * dy}px) rotate(${t*360}deg);`
		};
	}
</script>

<div class='board'>
	<input
		placeholder="계획한 일을 추가하세요."
		on:keydown={e => e.key === 'Enter' && add(e.target)}
	>

	<div class='left'>
		<h2>할 일</h2>
		{#each todos.filter(t => !t.done) as todo (todo.id)}
			<label animate:whizz>
				<input type=checkbox on:change={() => mark(todo, true)}>
				{todo.description}
				<button on:click="{() => remove(todo)}">remove</button>
			</label>
		{/each}
	</div>

	<div class='right'>
		<h2>완료</h2>
		{#each todos.filter(t => t.done) as todo (todo.id)}
			<label class="done"
						 animate:whizz
			>
				<input type=checkbox checked on:change={() => mark(todo, false)}>
				{todo.description}
				<button on:click="{() => remove(todo)}">remove</button>
			</label>
		{/each}
	</div>
</div>

<style>
	.board {
		display: grid;
		grid-template-columns: 1fr 1fr;
		grid-gap: 1em;
		max-width: 36em;
		margin: 0 auto;
	}

	.board > input {
		font-size: 1.4em;
		grid-column: 1/3;
	}

	h2 {
		font-size: 2em;
		font-weight: 200;
		user-select: none;
		margin: 0 0 0.5em 0;
	}

	label {
		position: relative;
		line-height: 1.2;
		padding: 0.5em 2.5em 0.5em 2em;
		margin: 0 0 0.5em 0;
		border-radius: 2px;
		user-select: none;
		border: 1px solid hsl(240, 8%, 70%);
		background-color:hsl(240, 8%, 93%);
		color: #333;
	}

	input[type="checkbox"] {
		position: absolute;
		left: 0.5em;
		top: 0.6em;
		margin: 0;
	}

	.done {
		border: 1px solid hsl(240, 8%, 90%);
		background-color:hsl(240, 8%, 98%);
	}

	button {
		position: absolute;
		top: 0;
		right: 0.2em;
		width: 2em;
		height: 100%;
		background: no-repeat 50% 50% url("data:image/svg+xml,%3Csvg xmlns='http://www.w3.org/2000/svg' viewBox='0 0 24 24'%3E%3Cpath fill='%23676778' d='M12,2C17.53,2 22,6.47 22,12C22,17.53 17.53,22 12,22C6.47,22 2,17.53 2,12C2,6.47 6.47,2 12,2M17,7H14.5L13.5,6H10.5L9.5,7H7V9H17V7M9,18H15A1,1 0 0,0 16,17V10H8V17A1,1 0 0,0 9,18Z'%3E%3C/path%3E%3C/svg%3E");
		background-size: 1.4em 1.4em;
		border: none;
		opacity: 0;
		transition: opacity 0.2s;
		text-indent: -9999px;
		cursor: pointer;
	}

	label:hover button {
		opacity: 1;
	}
</style>
실행한 결과는 아래와 같다.
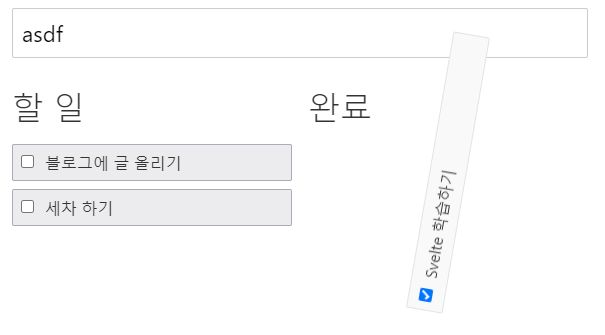
항목이 변경될 때마다 아이템이 빙글빙글 도는 애니메이션으로 변경되었음을 확인할 수 있다. 위와 같은 형태로 사용자 정의 애니메이션을 애플리케이션에 적용할 수 있다.
애니메이션 사용 시 주의사항
Svelte 애니메이션을 사용할 때 3가지 주의사항이 있는데, 아래에서 확인해보자.
1) Key가 설정된 Each 블록에서만 사용해야 한다. 즉, 아래와 같은 포맷으로만 사용 가능하다.
{#each 리스트 as 아이템 (키)}
<요소 animate:애니메이션 함수 />
{/each}
2) Each 블록 아래의 직계 자식 요소에서 animate 디렉티브를 설정해야 한다. 위의 예제에서도 Each 블록 바로 아래의 <label> 요소에 animate 디렉티브가 붙어있는 것을 볼 수 있다.
<div class='left'>
	<h2>할 일</h2>
	{#each todos.filter(t => !t.done) as todo (todo.id)}
		<label animate:whizz>
			<input type=checkbox on:change={() => mark(todo, true)}>
			{todo.description}
			<button on:click="{() => remove(todo)}">remove</button>
		</label>
	{/each}
</div>
3) 애니메이션은 Each 블록 대상 리스트가 업데이트될 때만 동작한다.
이상으로 Svelte의 애니메이션에 대해 알아보았다. 다음 글에서는 요소를 변경하는 트랜지션에 대해 알아보도록 하겠다.
오늘은 여기까지~
'재주껏 하는 Front-End > Svelte (준비중)' 카테고리의 다른 글
| 16. Transitions (0) | 2020.12.14 |
|---|---|
| 14. Motion (0) | 2020.12.01 |
| 13. Module Context, Debug (0) | 2020.11.27 |
| 12. Context API (2) | 2020.11.24 |
| 11. Special Elements (0) | 2020.11.12 |